As part of our TIDESS project, we have been investigating ways in which children and adults interact with interactive spherical displays. As such, we have been porting our tabletop prototype [1] (Figure 1) onto a physical spherical display [2] (Figure 2), as well as to a virtual spherical format (i.e., a globe you interact with from a flatscreen display like a computer). Having a virtual sphere will enable us to test our prototype virtually with users – an especially important functionality considering the current pandemic. For the virtual spherical format, we chose to use Unity because it allows us to import assets and write scripts to enable customizable interactions.

Figure 1. Tabletop Prototype with straight slider
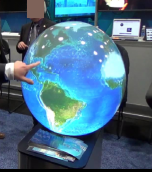
Figure 2. Physical Spherical Display
While using the virtual sphere, users can view temperature maps of ocean temperatures during different months of the year. Due to the spherical form factor, sliders on the physical sphere were implemented as rounded instead of straight (Figure 1). Because we are attempting to match the physical spherical display’s general look and functionality, I recently spent some time building a quarter-circular slider in Unity (Figure 3), with which users will be able to select which data to view.
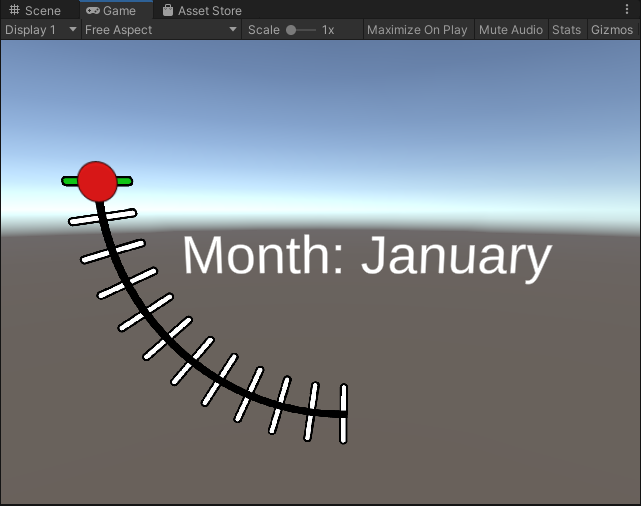
Figure 3. Quarter-circle month slider
I was not able to find any information online that explained how to build a semi- or quarter-circular slider in Unity. Therefore, I used multiple videos and Unity forums while I was putting this slider together from scratch. In case my efforts would be useful to others looking to do the same thing someday, I decided to make a tutorial of how to create a quarter-circle slider in this blog post.
Please note, I used Unity version 2019.4.18 to create the quarter-circle slider.
You will need the following scripts and .png images to complete this tutorial (I will include the images and C# scripts at the bottom of this post):
- FullCircle.png
- QuarterCircle.png
- SingleTick.png
- CircleSlider.cs
- ConstrainedKnob.cs
Here are the stepwise instructions for creating your very own quarter-circle slider:
- Right click in hierarchy>UI>Canvas. Rename the new canvas SliderCanvas. In the SliderCanvas Inspector, set the Render Mode to “World Space” and assign the “Main Camera” as the Event Camera (Figure 4).
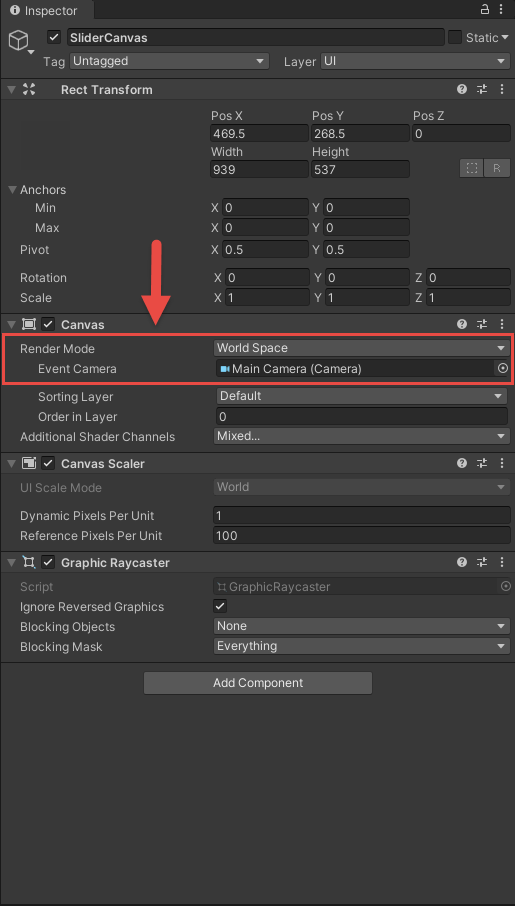
Figure 4. SliderCanvas Inspector set-up
- Create the hierarchy you see in Figure 5.
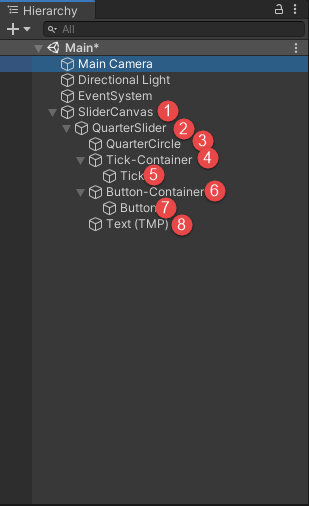
The items in Figure 5 correspond to the numbers in parentheses (e.g., the red 1 referring to SliderCanvas in the hierarchy set-up is denoted here as SliderCanvas (1)). To create the hierarchy on the left, the following steps are needed:
(1) – right click > UI > Canvas
(2), (3), (5), (7) – right click > UI > Image
(4), (6) – right click > Empty
– After creating these, go into the inspector, click Add Component > Rect Transform
(8) – right click > UI>Text
Place the objects in the order in which you see them in Figure 2.
Each of the objects you created should have been set up one above the other by default. Leaving them aligned for now will make it easier for us to ensure that the correct objects rotate together around the same point. I suggest moving the Text (8) object to the side as it will not be rotating at all.
Your scene should look something like Figure 6.
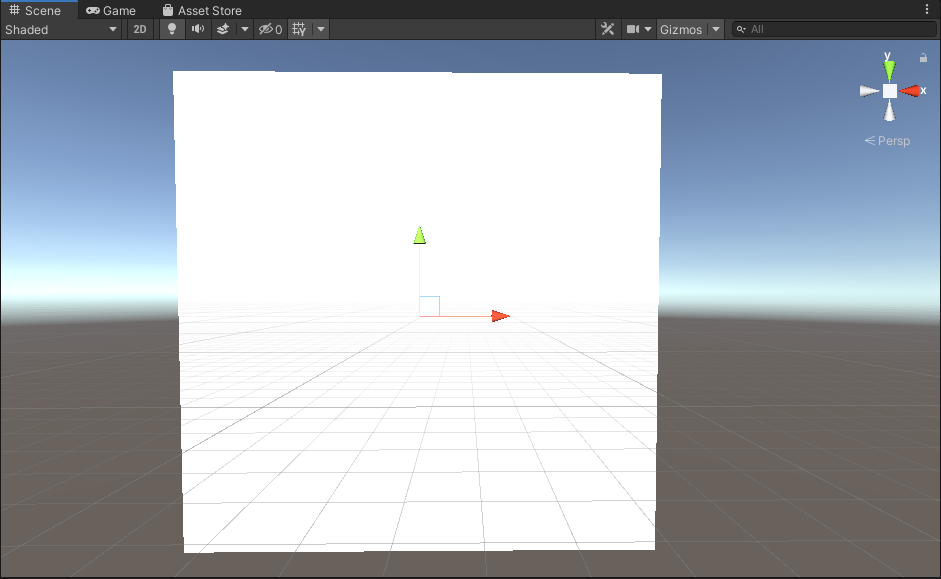
Figure 6. Scene after adding all the GameObjects
- Make sure that your main camera is looking at the same thing you are. Select Main Camera from the hierarchy and you will see a camera preview in the bottom right corner of the screen. In the top toolbar, go to GameObject>Align View to Selected. Now you should see your canvas in the bottom right corner of the screen (Figure 7).
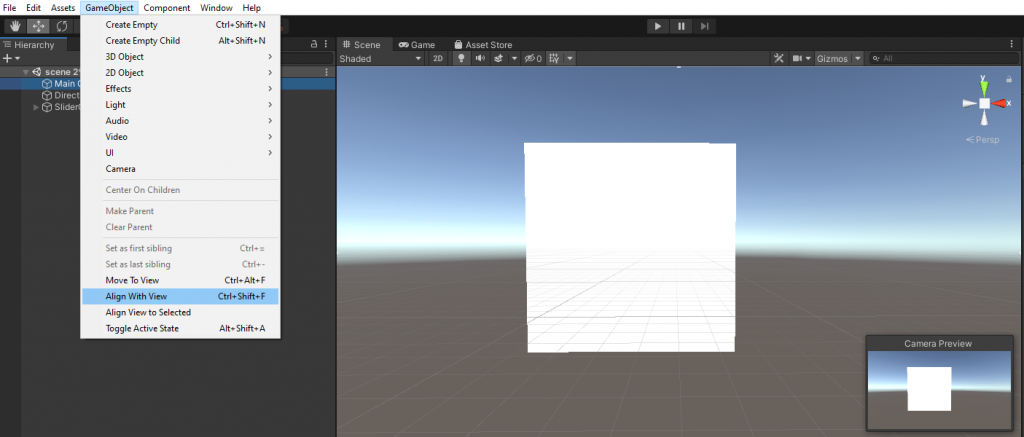
Figure 7. Setting up the Main Camera
- Deactivate all the objects underneath QuarterSlider (2) so that you are only dealing with one white placeholder square. You can deactivate an object by clicking on the check mark in the top left of the inspector. After you deselect all the objects underneath QuarterSlider (2), Unity should look similar to Figure 8.
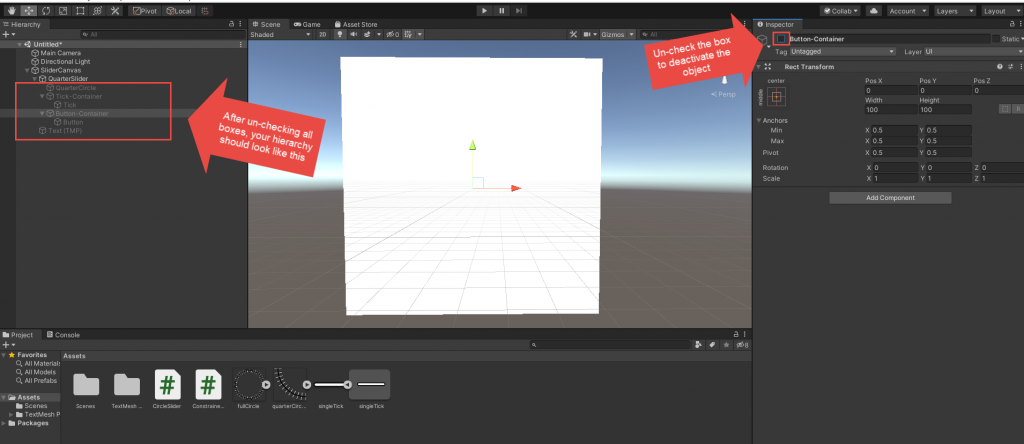
Figure 8. After deselecting some GameObjects
- View the Inspector for the QuarterSlider (2) Select FullCircle as the source image. Select Image Type>Filled, Fill Method>Radial 360, Fill Origin>Left, and Fill Amount 0.25. You should see that the complete circle you saw in the scene now looks like a quarter circle. Make sure to de-select the “clockwise” option if you want the slider to curve downwards. You can also add the CircleSlider script at this time (under Inspector>Add Component>CircleSlider).
- In the script inspector, you add Button-Container (6) as the Button object, Tick-Container (4) as the Tick Mark object, and Text (8) as the Text Month.
- Your Unity window should look similar to Figure 9.
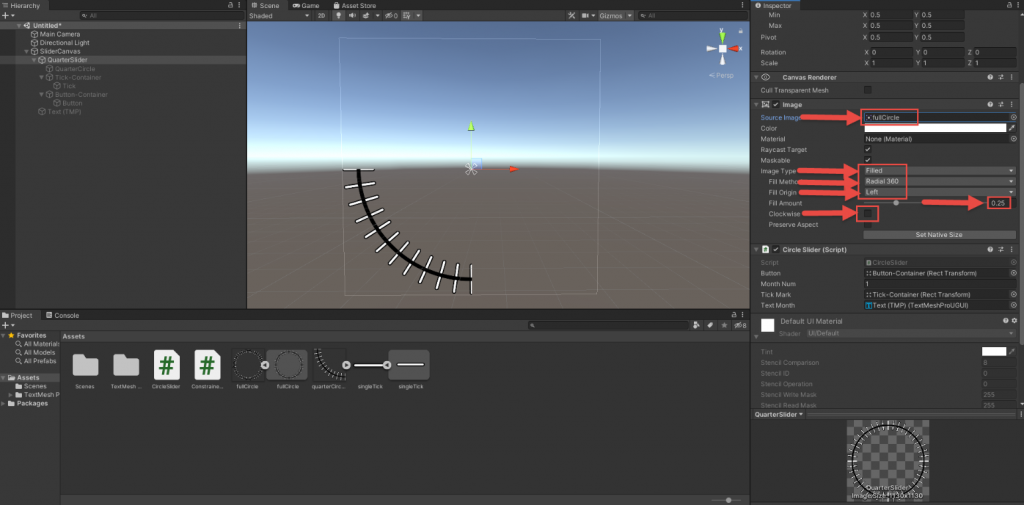
Figure 9. Unity window after working on the QuarterSlider (2)
- Re-activate the QuarterCircle (3) by selecting it from the hierarchy and re-checking the enable/disable box. View the Inspector for the QuarterCircle (3) Select the QuarterCircle image as the Source Image. Resize the image until it fits perfectly over the underlying QuarterSlider (2) object. The image in QuarterSlider (2) exists mainly so that you can align the image in QuarterCircle (3) correctly (Figure 10).
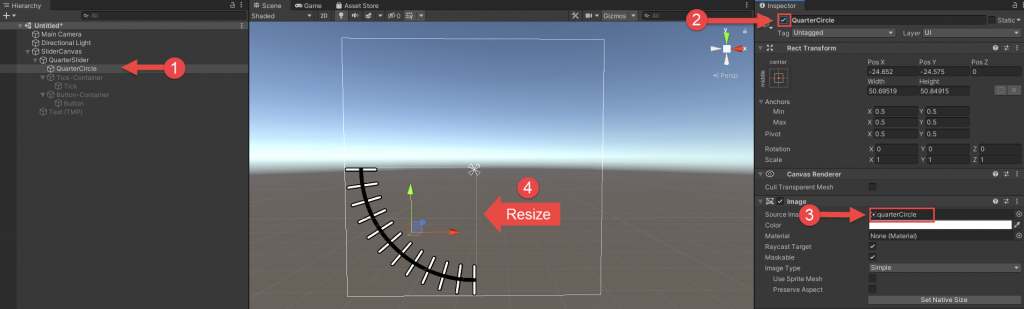
Figure 10. Resize the QuarterCircle (3)
- Reactivate the Tick-Container (4) like you just reactivated the QuarterCircle (3) in step 6. In the inspector for the Tick (5) object, select the SingleTick image as the Source Image. Change the color of your tick mark (I chose to make mine green). Resize the tick mark and position it so that it is perfectly overlaying the top tick mark of the QuarterCircle You do not have to worry about the center of the Tick (5) object being somewhere other than the center of the circle – that is the purpose of the Tick-Container (4). (Figure 11)
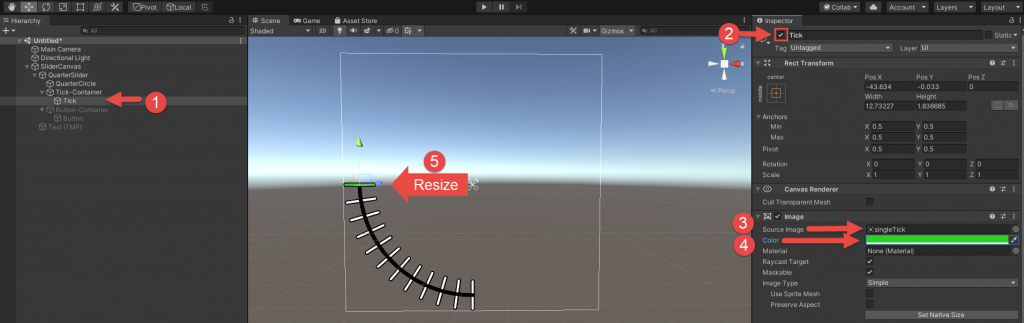
Figure 11. Add the tick mark
- Reactivate the inspector for the Button-Container (6). In the inspector for the Button (7) object, select the Knob as the source image (this is a default image that comes with Unity). Change the color if you want (I chose to make mine red). Resize the button and position it so that it is centered on the Tick (5) you placed in the previous step. Your view should now look something like Figure 3. Add the script that makes the Button (7) clickable and draggable in a circle by adding the ConstrainedKnob script: Add Component>ConstrainedKnob. Add the QuarterSlider (2) as the CircularPath object in the script inspector (Figure 12).
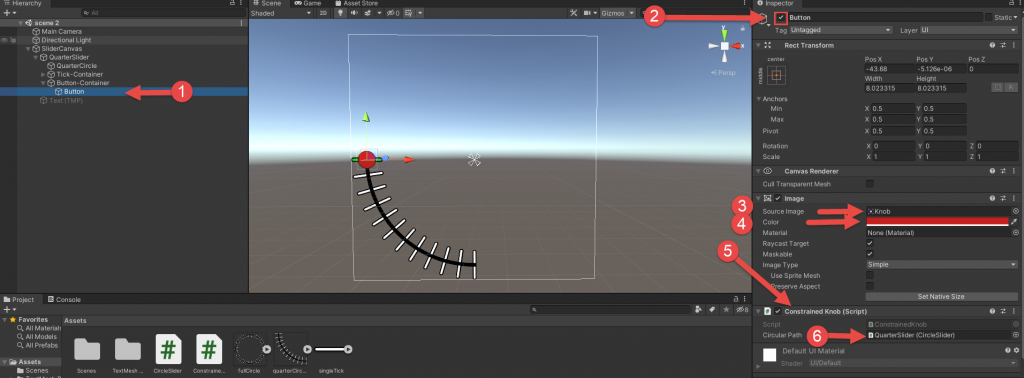
Figure 12. Implement the button
- Enable the text again. When you press “Play,” the slider value should change and the Text (8) value should change according to which tick mark you are on! (Figure 13)
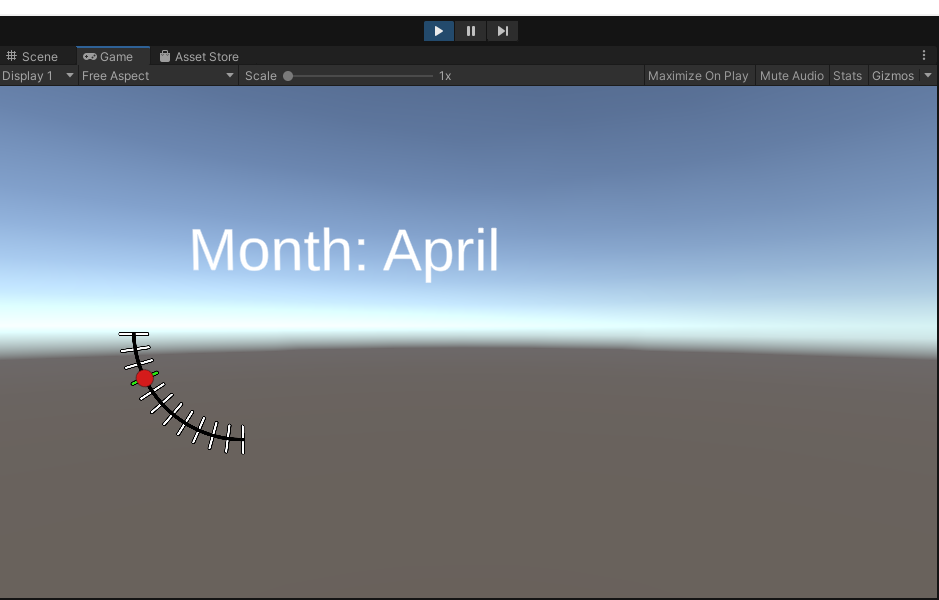
Figure 13. Finished slider
I am a first year PhD student working in the INIT lab. I am very excited to have the chance to explore Unity through the scope of the TIDESS project. I hope my understanding of Unity and what it can do continues to increase so dramatically! Please feel free to reach out to me (kjurczyk@ufl.edu) if you have questions or are interested in more information.
Please copy and paste the following link address into your browser to download the .zip file for this tutorial: http://init.cise.ufl.edu/wordpress/wp-content/uploads/2021/04/CircleSlider_files.zip
Bibliography
| [1] | C. Schuman, K. A. Stofer, L. Anthony, H. Neff, P. Chang, N. Soni, A. Darrow, A. Luc, A. Morales, J. Alexandre and B. Kirkland, “Ocean Data Visualization on a Touchtable Demonstrates Group Content Learning, Science Practices Use, and Potential Embodied Cognition,” Research in Science Education, 2020. |
| [2] | S. Gleaves, “Iterating on Our Sphere Prototype – TIDESS Museum Deployment,” UF TIDESS Project, 13 May 2019. [Online]. Available: https://uftidess.wordpress.com/2019/05/13/iterating-on-our-sphere-prototype-tidess-museum-deployment/. [Accessed 28 February 2021]. |
Helpful Sources – YouTube Videos & Unity Forums
Rounded Healthbar – using Image Fill & Mask #C – Gave me an idea of how to approach the rounded slider.
Clicking and Dragging 2D Sprites – This YouTube video helped me understand the basics of draggable objects.
Drag Gameobject with Mouse – After I understood a bit about dragging objects, I watched this video to gain more understanding of how to refine the dragging experience (e.g., making sure the user could click wherever they wanted on draggable object when they wanted to drag it).
All About Sliders UI Element – Helped me understand how to change text based on a slider value.
Thank you to everyone on the Unity Forums as well. The questions and answers of everyone on this platform were extremely helpful while I was trying to create and debug my slider.